Wednesday, February 22, 2012

PCB, easy as 123!

At last! The printed circuit board that I designed has arrived for my fermentation chamber thermostat.  Actually, I received it just over a week ago but haven't had a chance to document it.  I was very happy to see a package from BatchPCB in the mail.  Even more so to find it contained a second bonus board (not sure why, but it will be nice to have another one if when I ruin the first one.)


As expected, I did realize some mistakes that I made (shocking... I know) in the design of the board .  I, for some reason, didn't allow access to the microcontroller chip for reprogramming purposes.  So I had to add another header on the board for that.   I did this by drilling small holes in the pattern of the header into the PCB. Then after placing the header into the holes, I soldered small stretches of 30 gauge wire between the desired contacts.  There's nothing like going at your new prized possession with some power tools to get the blood flowing!

I also decided that the placement of the LED's on the board were too high (with respect to the faceplate of the case), I resolved this issue by placing the headers and LED's onto the back side of the PCB and then installing the board face-down inside the case.  This moved the LED's further down on the faceplate.

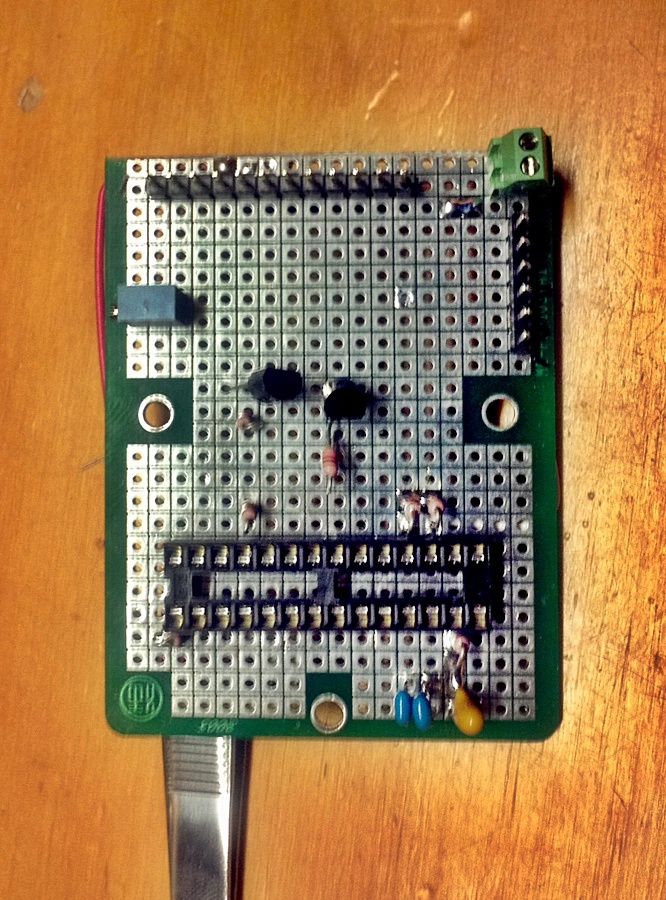
So after performing all the necessary changes, I soldered the remainder of the components.  I still have to test out all of the connections before I can add power and start using troubleshooting it, but all the parts are there... and I'm pretty happy about it!  Here's what it looks like:


You can see the little blue "jumper" wires just below the chip that I added to connect the new ICP (In-Circuit Programmer) header (all of the headers are shown in the top pic, what used to be the backside of the board).  I took these pictures before I cleaned the excess flux off of the board, which makes the board look even more sloppy (it certainly doesn't need any extra help).  Flux is a chemical that aids in the soldering process, it cleans the corrosion off the metal connections and allows the liquid solder to cling to the pads and wires.  However, it leaves a sloppy and dirty looking board afterwards.  The good news is that it comes right off with a little rubbing alcohol.

You'll notice that two of the corners of the board have been beveled.  This is so I can slide the board as close to the edge of the case as possible without interfering with the screw holes for the lid of the case. I'll add another post soon of how everything fits in the case.


Cheers!


Tuesday, February 7, 2012

Microcontrolled

I know you guys are just dying for more information about microcontrollers.  Well, I've just so happen to come across this presentation on the internet (I'm seeing some potential in this...).
This guy will tell you everything that you want to know about microcontrollers and more (probably WAY more).  It's a good presentation regardless of your existing knowledge of the subject.  If you'd like, you can just listen to parts of it , there are bookmarks on the left side so you can jump to different sections to get some overviews.

Check out the link here.

But more importantly, check out that guy's voice!  It's like SILK!   I'd listen to him describe the procession of an episode of food poisoning. Which is probably a good thing since, for some of you, this presentation will be equivocal to such a description.

Enjoy!

Thursday, February 2, 2012

Picture Time!

Welcome to February!  It seems odd that we are already in our second month of 2012.

I've been making pretty good progress lately on my thermostat, however, most of the work done has been updating the software embedded within the microcontroller, which makes it hard to convey physical progress.  I plan on creating and posting a video of the user interface, which should give a pretty good idea of the usability of the thermostat.

I've had this hardware setup for a while now, but haven't really given any indication of it other than a theoretical description of it.  So I thought I'd post a few pics to give you a visual idea of what it is I spend so much time aimlessly staring at with glazed eyes.

This first picture is the main "board" with the complete system attached.  And by board, I mean a scrap piece of wood I had sitting around the garage that I painted.  It just seemed to be a good way to keep all the parts together on a movable object.


The parts along the bottom of the board are components of the user-interface; the Menu, Up and Down buttons are on the bottom left and the LCD screen on the bottom right.
You can see the microcontroller chip in the middle of the white breadboard, the other electronic components are spread out between the remainder of the white breadboard and the blue breadboard at the top-center of the picture.
The PC board in the center of the picture with the USB cable is the PICKit2 board.  This board creates an interface between the microcontroller (the PIC) and my PC.  It allows me to upload the program to the PIC, start, stop, and reset the program as well as may other debug functions.

This next picture is the AC/DC power converter.  This converts the 120 volts of AC (alternating current) power from your outlet to 5 volts of DC (direct current) power.  This is similar to what you will see if you were to take apart one of the big heavy outlet blocks that power the majority of your electronic devices.


And finally, I snapped a picture of all the components as well as the box (seen in the bottom left corner of the picture) that all of this needs to fit in to.


All I need is a shoe horn and a hammer and it will fit just fine!

I'll try and get a video out soon to give you an indication of how the user interface works.


Monday, January 23, 2012

Oatmeal

Oatmeal??  Yes.  I'm sure you are wondering what oatmeal could possibly have to do with ANYTHING that this blog touches on.  Well, I'll get to that...

When oatmeal comes to mind, I'm sure most of you think: "crappy breakfast" .  Well, oats are a grain, and grain is what you use to make beer.  Although beer is mostly made of malted wheat and barley, small amounts of oats can be added to a beer recipe to impart some excellent additions to a beer.

I am currently in the process of brewing an oatmeal stout, in fact, I just bottled it several days ago and it should be ready to drink very soon.  An oatmeal stout is a very similar to other stouts (Guinness beer is a stout, for instance), except that adding oatmeal increases the body, viscosity and silkiness of the beer.  There was an article posted in "Brew Your Own" magazine that describes it this way:
"Typically, oatmeal stouts do not specifically taste of oats. However, the oats impart the well-known smoothness because of their high content of proteins, lipids (includes fats and waxes), and gums. The gums increase the viscosity and body of the beer."
To put it in slightly less technical terms:  Oatmeal has tiny particles of awesome contained within the grain, these bits of awesome are transferred to the beer during the brewing process, oatmeal's awesome particles are infused with the already sizable awesome particles contained within the beer, adding to the overall awesomeness of the beer.

So when I decided to create an oatmeal stout, I figured I would do some research on the beer to hopefully pick up some tips to help me out a bit.  Within minutes of researching, I found probably the best advice possible.  It instructed:

"In a sublime stout, you need to create an effective interplay between the robust immediateness of the roasted, acrid malts and the floral-aromatic reverberations of the hops."
Uh..  Right, got it.  So this is going to be easier than I thought!!   As instructed, this was the first step that I performed when I started making my beer... you're just going to have to trust me on this one.   I guess we'll just have to wait and see if I was successful in creating the "effective interplay".   I'm guessing this is going to take awhile for all the ingredients to get to know each other well enough to commence in interplay...

Hopefully this will give you guys something a little more enlightening to imagine when you hear the word "oatmeal".


Summary for the Skimmers:   Oatmeal has the lipids.  There's no known cure... but it certainly makes for good beer!

Saturday, January 14, 2012

Cocktail Robots

A cocktail robot is exactly what you would expect it to be:  an automated device that can mix drinks for you on command.  And believe it or not, my final project for my senior microcontroller class in college was a cocktail robot.  The project was a complete disaster!  In hindsight, it's very possible that more time was spent sampling the product than working on the project.  The final demonstration didn't go well at all. In fact, whenever you exclaim "Oh Sh*t!" during a recorded final demonstration, things aren't going very well...at all.  However, for some reason, the professor generously gave us a passing grade. 

Anyway, I was reminded of this project when I came across an online story of a similar project (although considerably more creative... and working).  Apparently, there is quite a community out there that builds these types of projects.  In fact, there are several annual competitions to demonstrate your robotic (and possibly drinking) chops.

So anyway, you absolutely need to check out the cocktail robot that was created by the folks over at Evil Mad Scientist Laboratories.  Pay close attention to the devices they used to pump the ingredients!  Funny!  The fact that they are making white russians with the robot makes it even better!


Here is the link to the original article, complete with more pictures as well as a video.

"White Russian? Coming right up, heavy on the irony!"


Thursday, January 12, 2012

Happy New Year!

Happy 2012 to all!

The holidays were a whirlwind, good times were had by all, but unfortunately, I'm pretty sure that good times are inversely proportional to progress.  Or, if you don't mind me going all geek on you:


I have high hopes for this year with many great things planned and high expectations!  I plan on completing my thermostat for my fermentation chamber fairly early in the year. If all goes well with the thermostat, I will move forward with getting this device available for other home brewers to use. However, lots of work has to be completed for that to happen.   Plus I have to overachieve a little this year in case the Mayans were right (er.. got lucky).


Here's to a good year!!

Thursday, December 8, 2011

Prototypical Stuff

Hola!

So I'm actually to a point on this thermostat that I'm ready to actually start building the PC board that contains controller and accompanying components (the smarts of the innards).  I've actually spent a few hours placing, soldering and wiring the parts on the prototype board.  This is tedious work to say the least, you are working with tiny parts and a soldering iron (which is essentially a pen shaped, skin searing device that rests at 700 degrees F).  Burned skin, strained eyes and fingers are consistently a by-product of this process.

Here is a front/back pic of the progress I've made so far; I'm at about 40% complete:


So at this point in the soldering process, already sick of it and looking for alternatives, I visited a few PCB (Printed Circuit Board) websites and found an awesome (fairly) new website and service setup for people making prototype PCBs.(Hey wait, I'm a people wanting to make protoype PCBs)  Making PCBs aren't very expensive, as long as you are getting hundreds of them made at a time, to make small one, it's quite expensive. 
The service that I found essentially takes dozens of submissions for boards from multiple customers and places them together like a puzzle on one big board.  Then it sends this large, completed puzzle off to get it printed.  When it gets this large board, it slices up all the pieces to distribute to everyone.  This way, the price is divided up among the dozens of people building boards.  BRILLIANT!!

So for about $15 I can design my own PCB and have it printed for me.  Screw all this start-from-scratch fabrication crap!  The downside is that there is a 3 week delay before I get the board back, but that's acceptable.

So, the last couple night's I downloaded the software used to design and route the board, read a few tutorials and got to work.  Within a few short hours, I'm almost ready to send off my first PCB!  Sweetness!! 

Here's a screenshot of the layout of the PCB:


I'll keep you posted when this baby shows up.  Stay tuned!